
In this article, I will share how to automate a space heater using a Bluetooth thermometer, an affordable WiFi-connected power outlet, and Home Assistant with the Node-RED add-on.
Use the Table of Contents on the right to quickly jump to specific sections.
Introduction
Old House Problems
My home was built over a century ago in 1915. Although the house was recently renovated, there are some quirks that will almost always be present in a building this old.
Specifically, someone at some time over the last 100 years decided that they wanted to convert the front porch into a small room adjacent to the living room. It’s a little strange, but it also turns out to be the perfect room for house plants. A large, South facing window allows for the best light for plants out of the entire home.
Whatever this room gains in light, however, it does not retain in warmth. Given the room’s quirky origins, it is not very well insulated and is easily several degrees off from the rest of the house. Unfortunately this does not bode well for the plants during the winter months.
A Smart Home Solution
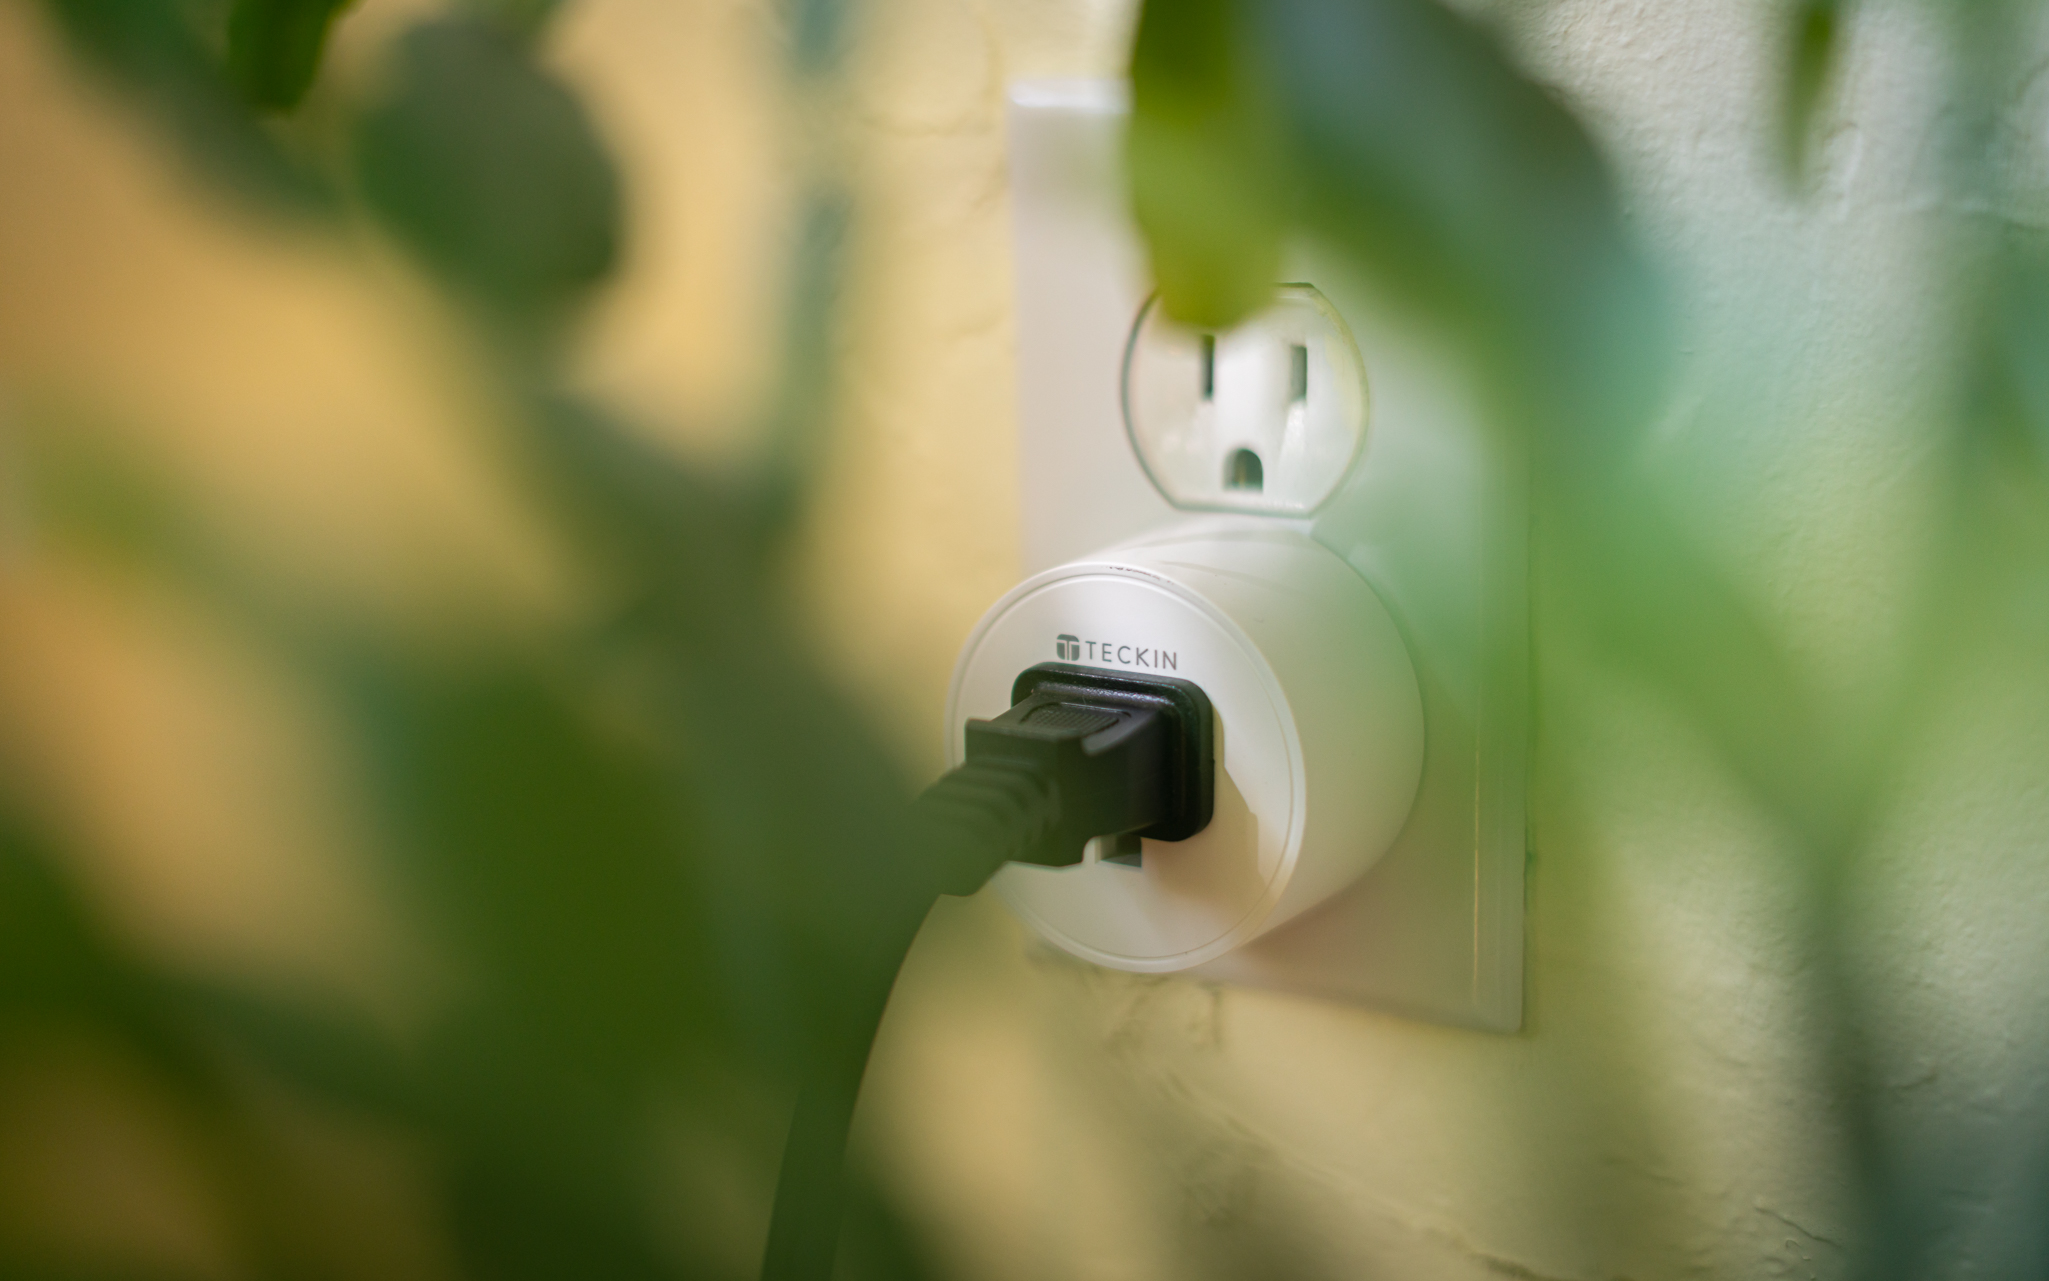
Using a spare smart outlet connected to Home Assistant, I have created a solution that controls a small electric heater based on readings from a Bluetooth thermometer.
My Raspberry Pi 3 powered Home Assistant server runs a Node-RED Flow that queries the current temperature from the thermometer every 60 seconds. If the temperature is below 69° F, the Flow sends a signal to activate a WiFi connected smart outlet. This outlet is connected to a small electric heater that I happened to have in the basement.
The heater warms up the room until it reaches 69°, where the Flow signals to turn off the smart outlet. This results in the room maintaining an even 69° as the days and nights get colder — the perfect environment for the plants to thrive all year long.
This simple climate control solution costs under $50 to put together and is a snap to configure. Let’s get started.
Requirements
Prerequisites
To complete this tutorial, you should already have:
- A Home Assistant server (I run mine on a Raspberry Pi 3)
- The Node-RED add-on for Home Assistant
- The HACS (Home Assistant Community Store) add-on for Home Assistant
- The File Editor add-on for Home Assistant
Additional Materials
- WiFi-enabled smart plug (I use TECKIN Mini WiFi Outlet)
- Bluetooth-enabled thermometer (I use the XIAOMI Mijia Bluetooth Thermometer)
- Space heater
Heads Up
When scoping out smart switches, plugs, and other equipment, make sure to buy items compatible with Home Assistant.
Initial Configuration
Setting Up the WiFi Plug
- Use your phone to set up your smart plug following the instructions that came with the device.
- Since I have the TECKIN WiFi Outlet, I used the “Smart Life” app to set it up.
- Give your plugs names that are easily recognizable. This will help later when working in Home Assistant, and makes it easier to control the plugs with your voice if you choose to link these to your preferred voice assistant.
- In the Home Assistant sidebar, navigate to Configuration → Integrations
- Tap the orange “Add Integration” button in the bottom right.
- Search for “Tuya” (or the integration for your specific device) and then sign in.
Home Assistant will now create Devices and Entities for anything associated with the Tuya integration.
Your devices and entities can be viewed using the navigation at the top of the Configuration view.

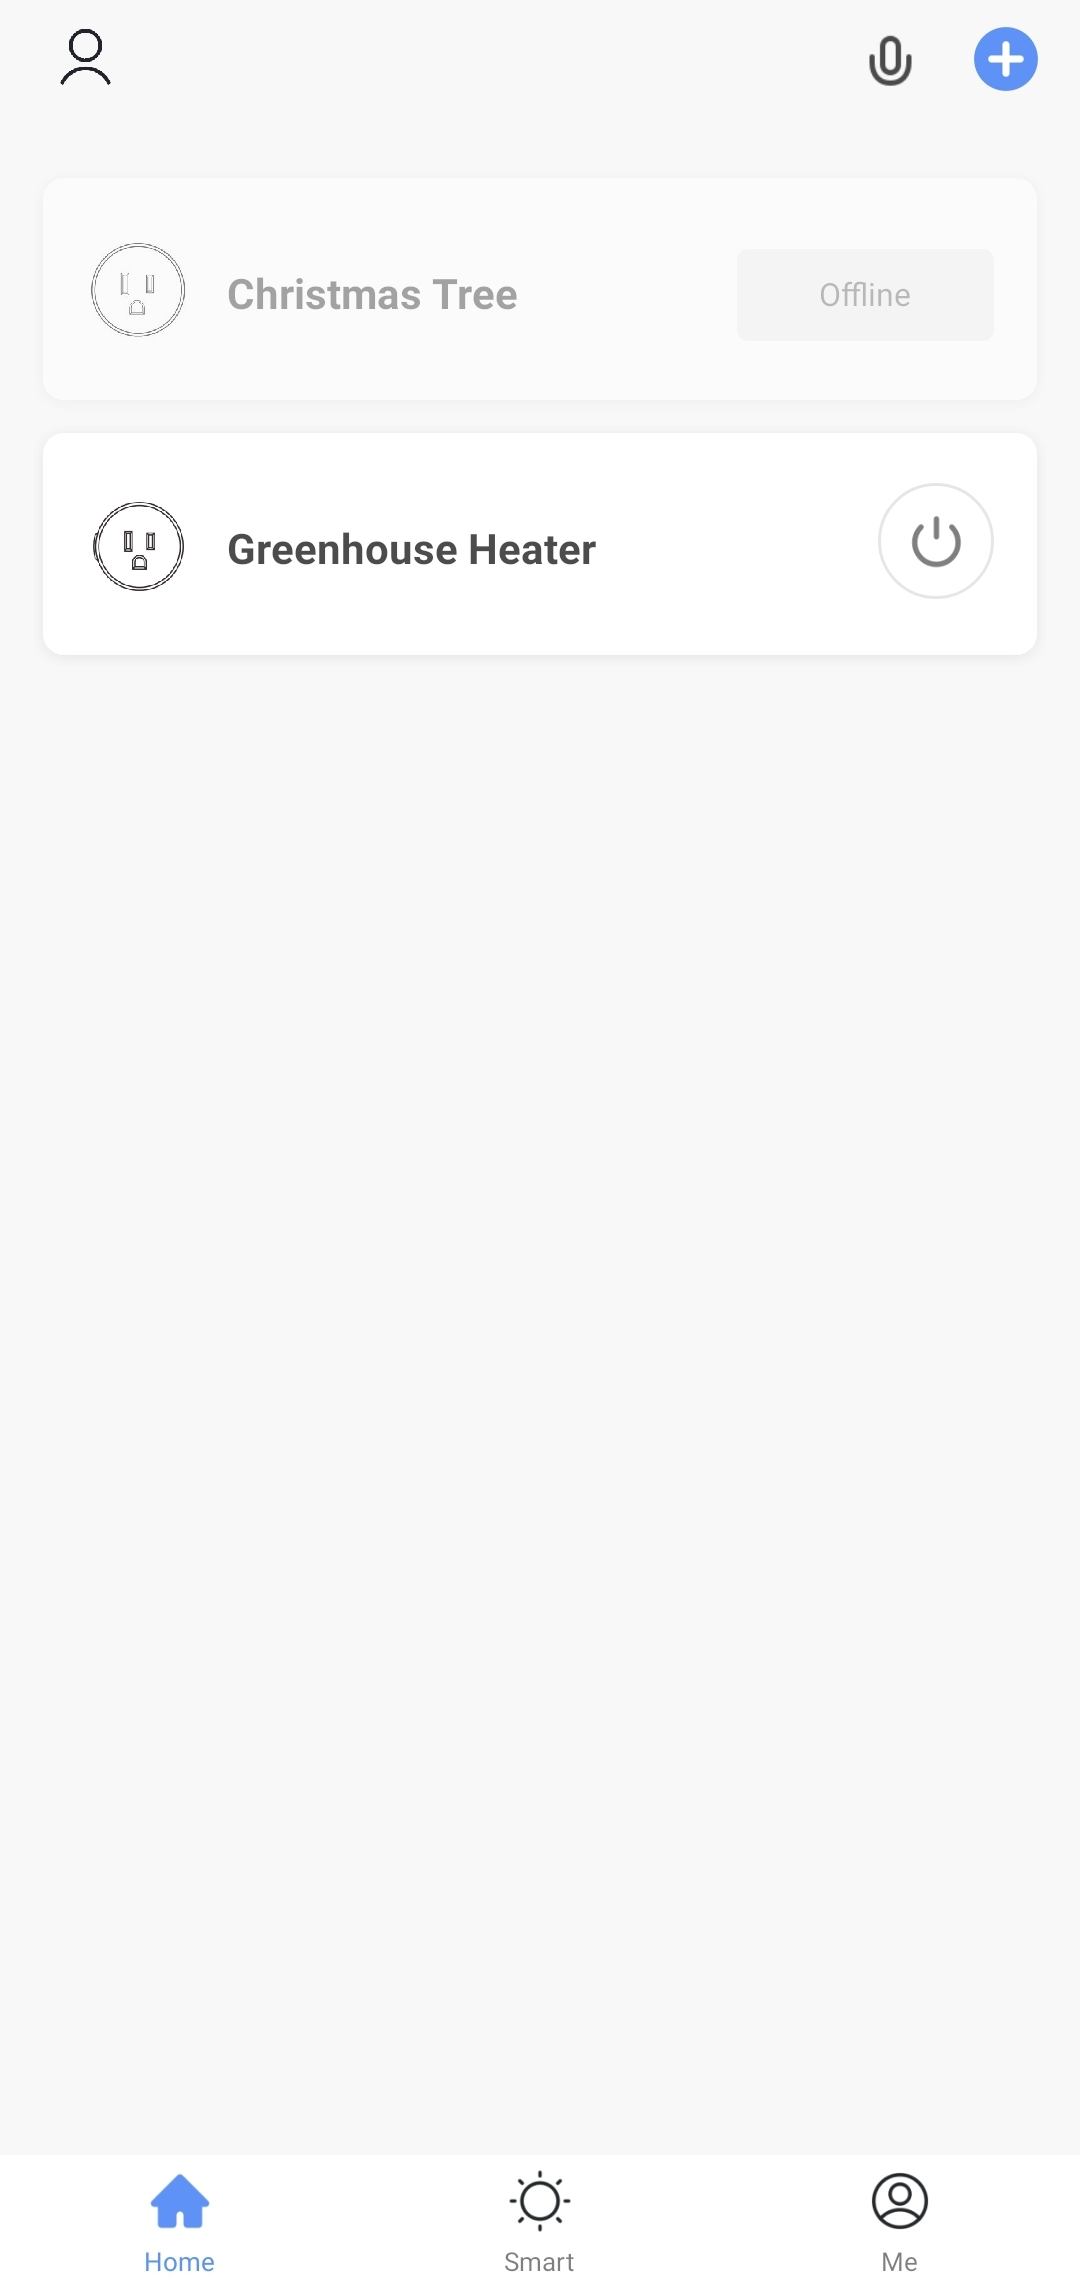
Here’s how my plug is configured:
| Device | Entity ID |
|---|---|
| Greenhouse Heater | switch.greenhouse_heater |
Setting Up the Smart Thermometer
Configuring Home Assistant to receive updates from the Mijia Bluetooth Thermometer is not straight forwards and requires several steps.
Note that I was unable to use the default Xiaomi Mijia BLE Temperature and Humidity Sensor Home Assistant integration. Your mileage may vary – instead, I recommend that you follow the steps in this section to ensure success.
If the default integration works for you, skip to Building the Automation.
Heads Up
The following steps are specific to the XIAOMI Mijia Bluetooth Thermometer range, and may not apply to thermometers created by other brands.
Part One: Thermometer First Steps
- Boot the thermometer by removing the plastic tab from the battery compartment.
- The thermometer will turn on, but will not start broadcasting its data until connected to the XIAOMI Home app.
- Download the app and (unfortunately) create an account.
- Navigate to add a device and select the Mijia Thermometer.
- The thermometer will now be active and available for use. You may delete the app – the thermometer is sending periodic broadcasts of its data over Bluetooth.
Part Two: Linking to Home Assistant
Heads Up
As noted in the Requirements section, you should have the HACS (Home Assistant Community Store) add-on installed on your Home Assistant server before proceeding.
Warning
This tutorial was written for the Passive BLE Monitor Integration version 0.7.x and earlier. At the time of publish, some changes made in 0.8.x and later may break this integration.
This article will be updated soon to reflect the changes made in Passive BLE Monitor Integration version 0.8.x. This warning will be removed when the tutorial is up-to-date.
- In the Home Assistant sidebar, navigate to HACS.
- Tap “Integrations”
- Search for “Passive BLE Monitor integration”
- Tap to install the repository.

Info: Why is this necessary?
There are some documented issues with the built-in mitemp_bt sensor. This custom integration, “Passive BLE Monitor Integration” replaces the built-in mitemp_bt sensor with a custom sensor that actually works.
Read more about this custom integration on the Custom Components GitHub.
- Restart the Home Assistant server to enable the custom integration.
- Navigate to Configuration → Server Controls.
- Tap “Restart” and wait for Home Assistant to come back online.
Part Three: Enabling the Sensor
We will now configure the sensor in Home Assistant.
- In the Home Assistant sidebar, navigate to File Editor.
- Tap the small folder icon in the top left corner of the File Editor window.
- Navigate to
/configand then tap “configuration.yaml“ - Configure the sensor:
- At the bottom of the document, add a few blank lines.
- Type
sensor:and press Return. - Type
platform: mitemp_btand press Return. - Add configuration options as desired.
In my configuration, I have enabled rounding to the first decimal point (like: 70.3°). I am querying every 60 seconds and want to ignore battery data and discard invalid readings.
To use these same settings, use a copy of my configuration:
sensor:
  - platform: mitemp_bt
    rounding: True
    decimals: 1
    period: 60
    log_spikes: False
    use_median: False
    active_scan: False
    hci_interface: 0
    batt_entities: False
    report_unknown: False
whitelist: False- Save the file using the orangish-red “Save” icon in the top right corner.
- To make configuration file changes take effect, restart Home Assistant.
- Navigate to Configuration → Server Controls.
- Tap “Restart” and wait for Home Assistant to come back online.
- Rename the sensor to something you will remember:
- Navigate to Configuration → Entities.
- Find the Bluetooth thermometer. This will likely be named something nonsensical: Mine was named
sensor.mi_t_582d343ae051 - Tap on the Temperature entity and give it a new name and sensor ID.
- Tap “Update”
- Repeat for the Humidity entity.

Here is how my thermometer is configured:
| Device | Entity ID |
|---|---|
| Greenhouse Temperature | switch.greenhouse_temperature |
| Greenhouse Humidity | switch.greenhouse_humidty |
Building the Automation
With all of the components configured and ready to use, we can start building the brain of this operation: A Node-RED flow.
Heads Up
As noted in the Requirements section, you should have the Node-RED add-on installed on your Home Assistant server before proceeding.
About Node-RED
Info: About Node-RED
Node-RED is a programming tool used to connect hardware devices, APIs and online services in useful and unusual ways.
Node-RED uses a node system to watch for triggers, run data through a logical process, and perform actions accordingly. These node systems are known as “Flows”
Learn more on the Node-RED website.
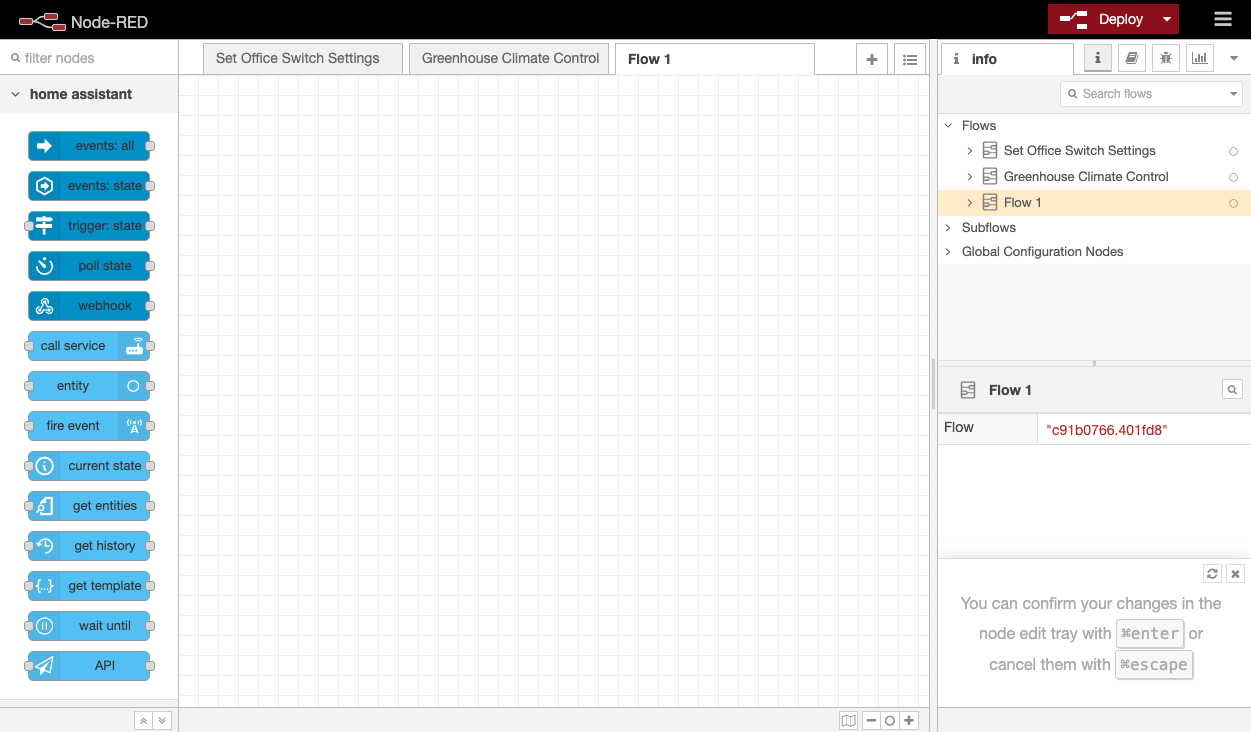
The Node-RED interface is made up of multiple panels.
In the center is the Flow view. This grid is where you will place and connect different nodes.
On the left is a list of available nodes. Nodes can basically be broken into three categories: listening, decision-making, and doing.
On the right is the Info panel, where you can view information about specific components, read documentation, or see debug output.
In this Flow, we will be using the following node types:
| Node Type | Purpose |
|---|---|
poll state | Asks Home Assistant for the current state of a given entity on a specified interval. |
current state | Asks Home Assistant for the current state of a given entity when called. |
switch | An if-else statement in node form. Checks input against rules and sends output based on the value. |
call service | Tells Home Assistant to do something with the specified entity. |
Creating the Flow
Part One: Receiving and Processing Data
- In the Home Assistant sidebar, tap Node-RED.
- If this is not your first Flow, tap the small + icon in the top right corner to add a new Flow.
- In the left sidebar, find the
poll statenode underhome assistant. Drag the node onto the grid.
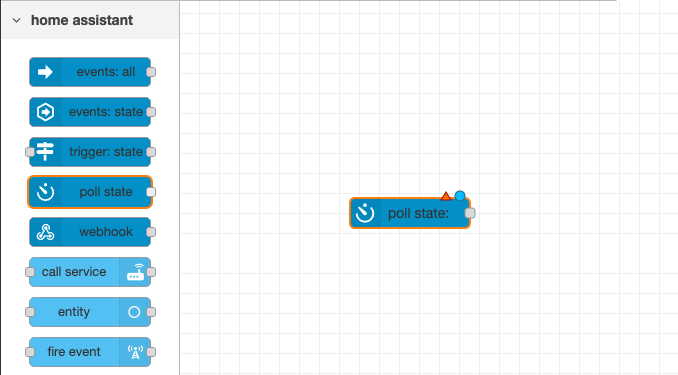
Info: Node Status Symbols
Node-RED will show small color-coded symbols on top of each node when there is something that requires your attention.
🔺 – The red triangle means that the node is not configured correctly.
🔵 – The blue circle means that the node contains changes which have not been deployed (saved).
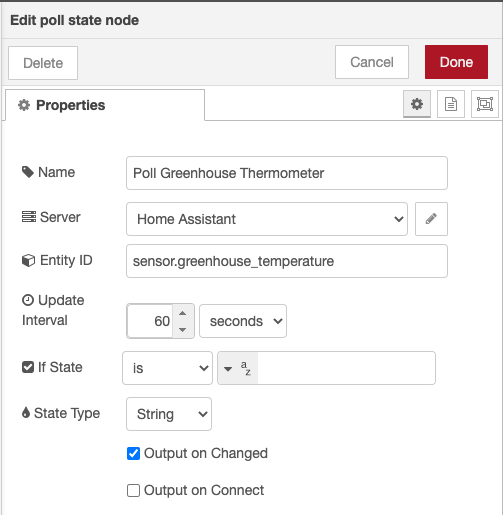
- Double-tap on the
poll statenode to configure it.- Add a name.
- Select the Home Assistant server.
- Search for and select the temperature sensor entity ID. My entity ID is:
sensor.greenhouse_temperature - Configure an update interval. I used 60 seconds since earlier I configured Home Assistant to query the temperature sensor every 60 seconds.
- Make sure State Type is set to String.
- Check to enable “Output on Changed”.
- Tap “Done”
- Find the
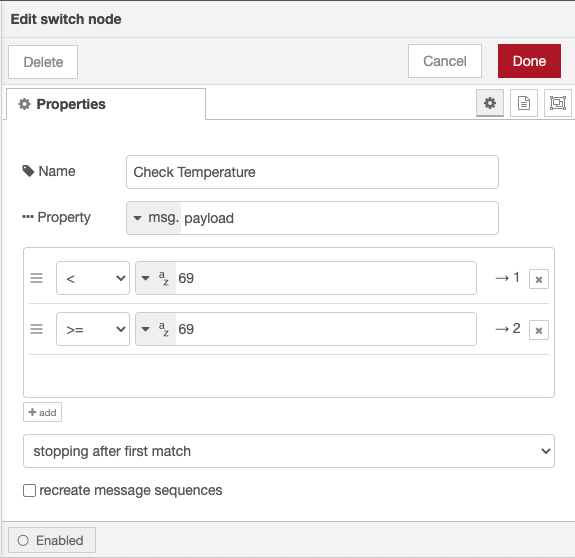
switchnode underfunctionin the left sidebar. Drag theswitchnode onto the grid next to thepoll statenode. - Double-tap on the
switchnode to configure it.- Add a name.
- For Property, select
msg.payload. This tells the node to look at themsg.payloadwithin any input it receives. - Create a rule that will be used turn on the heater if the temperature is too low.
- Set the rule to
<, meaning “less than”. - Add a temperature value. I’m in the United States, so based on my server locale the temperature value is in Farenheit. I want my heater to turn on when temperature drops below
69.0° F.
- Set the rule to
- Create a rule that will be used turn off the heater when temperature rises above the temperature configured in the previous rule.
- Tap the small “add” button in the bottom left of the rules view.
- Set the rule to
>=, meaning “greater than or equal to”. - Add a temperature value. I want my heater to turn off when the room temperature is
69.0° For higher.
- Using the dropdown menu at the bottom, select “stopping after first match”. This configures the node to stop processing rules and send output when a match is found.
- Tap “Done”
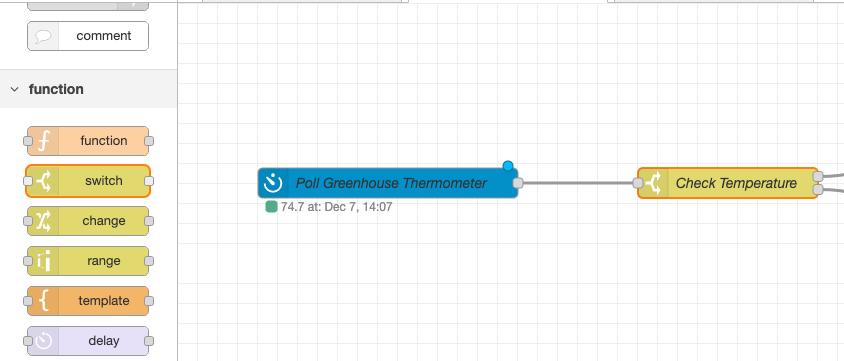
- Connect the output for the
poll statenode to the input of theswitchnode.- Tap and drag on the grey square on the right side of the
poll statenode and connect it to the grey square on the left side of theswitchnode. - This will allow the
poll statenode to send the temperature reading to theswitchnode for processing.
- Tap and drag on the grey square on the right side of the
Part Two: Turning the Heater On
We’ll start by configuring what happens when the switch node decides the temperature is too low.

To make sure that we don’t abuse our smart plug by sending too many requests, we will first check to see if it is already on or off.
- Drag a
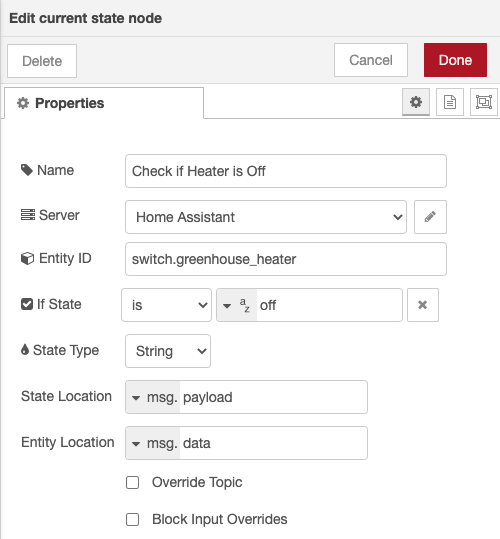
current statenode and drop it to the right of theswitchnode. - Double-tap the
current statenode to configure it.- Add a name.
- Select the Home Assistant server.
- Search for and select the smart plug device you are using to control the space heater. My device ID is:
switch.greenhouse_heater - Set the
If Staterule type to:is - Set the rule value to:
off - Tap “Done”
- Connect the top output from the
switchnode to the input of thecurrent statenode.- This will activate the
current statenode when the first rule of theswitchnode istrue, meaning the temperature is too low.
- This will activate the

Now we will use the call service node to tell the smart plug to turn on if it is not already activated.
- Drag a
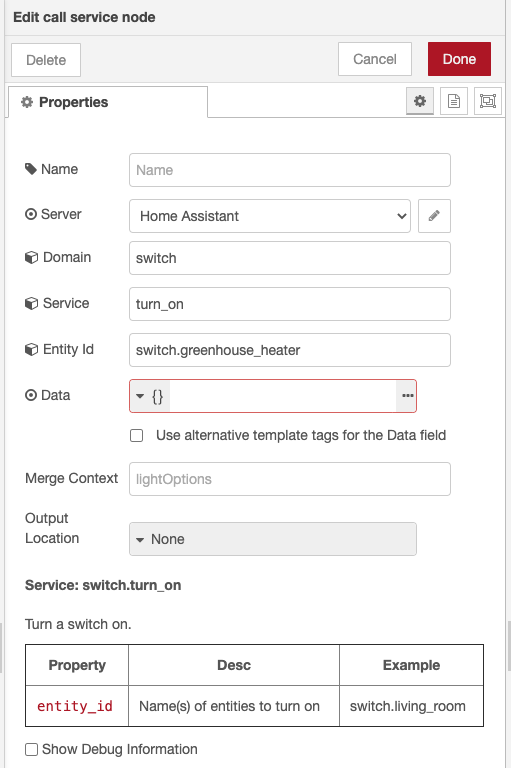
call servicenode from underhome assistantand drop it to the right of thecurrent statenode. - Double-tap the
call servicenode to configure it.- Add a name, if desired.
- Select the Home Assistant server.
- Configure the Domain to be:
switch - Set Service to be:
turn_on - Search for and select the smart plug. My device ID is:
switch.greenhouse_heater - Tap “Done”
- Connect the top output of the
current statenode to the input of thecall servicenode.- This will activate the
call servicenode if thecurrent statenode rules aretrue. - Do not connect the bottom output of the current state node to any other node. This will terminate the Flow (do nothing) if the
current statenode rules arefalse.
- This will activate the

Part Three: Turning the Heater Off
Now we will focus on the bottom half of the Flow, which will turn the heater off if the temperature is equal to or greater than the desired temperature.
- Tap on the
"Check if Heater is Off" current statenode. - Press ⌘-C (Mac) or Ctrl-C (Windows) to copy the node.
- Press ⌘-V (Mac) or Ctrl-V (Windows) to paste the node. Place the duplicate node to the right of the
"Check Temperature" switchnode and underneath the"Check if Heater is Off" current statenode. - Double-tap on the duplicate
"Check if Heater is Off" current statenode to configure it.- Change the name to reflect that this
current statenode will check if the heater is on. - Change the
If Staterule value to:on - Leave everything else the same, and tap “Done”
- Change the name to reflect that this
- Connect the bottom output of the
"Check Temperature" switchnode to the input of the"Check if Heater is On" current statenode.- This will activate the
current statenode when the second rule of theswitchnode istrue, meaning the temperature is above the desired level.
- This will activate the
- Tap on the
call servicenode. - Press ⌘-C (Mac) or Ctrl-C (Windows) to copy the node.
- Press ⌘-V (Mac) or Ctrl-V (Windows) to paste the node. Place the duplicate node to the right of the
"Check if Heater is On" current statenode and underneath the"switch:turn_on" call servicenode. - Double-tap on the duplicate
"switch:turn_on" call servicenode to configure it.- Edit the name, if necessary.
- Change the Service to:
turn_off - Leave everything else the same, and tap “Done”
- Finally, connect the top output of the
"Check if Heater is On"current statenode to the input of the"switch:turn_off" call servicenode.- This will activate the
call servicenode if the"Check if Heater is Off"current statenode rules aretrue. - Do not connect the bottom output of the current state node to any other node. This will terminate the Flow (do nothing) if the
current statenode rules arefalse.
- This will activate the

Deploying the Flow
The Flow is complete. To put these brains into action, tap the large red Deploy button in the top right corner.
You will see your Flow spring into action. The poll state node will connect to Home Assistant and obtain the current reading of the temperature sensor.
The temperature payload will be passed to the switch node, which will evaluate whether the temperature is too high or too low.
Depending on the current temperature, the switch node will either proceed to check if the heater is already on or off.
Let’s say the temperature is already warm enough – the switch node will activate the current state node to check if the heater is on.
If the heater is on, and it should be off, the current state node will use the switch:turn_off call service node to tell Home Assistant to turn off the smart plug.
After 60 seconds, the poll state node will check the temperature again and the Flow repeats.

Info: Flow Status Symbols
Node-RED will show small color-coded symbols on the bottom of each node when the Flow is active.
🟩 – The green square means that the node is active and received a valid input or successfully performed an action.
🟥 – The red square means that the node terminated the flow.
Each symbol is described with state at: date and time. This indicates the outcome of the node the last time it was activated.
Monitoring
You will likely want to keep an eye on the temperature of the room and the state of the space heater. The History view in Home Assistant will help with this.
The smart plug state will be represented in a timeline, where a red bar indicates the plug was turned off, and a green bar indicates the plug was on.
The temperature of the room will be displayed in a graph over time.
To easily monitor these components, add a panel to your dashboard.

- Navigate to “Overview”
- In the top right corner, tap the three dots and then tap “Edit Dashboard”
- Tap the orange “Add Card” button in the bottom right.
- Tap “Vertical Stack”
- I used the “Button” card for the Heater.
- Delete any entities that may have auto-populated.
- For “Entity”, select the smart plug. In my case, that’s
switch.greenhouse_heater
- Tap the “+” icon to add another card to the stack.
- I used the “History Graph” card so that I can see the temperature of my plant room over a 24 hour period.
- Delete any entities that may have auto-populated.
- Add the thermometer entity. In my case, that’s
sensor.greenhouse_temperature
- Tap “Save”
- Move the card wherever you like it, then use the “←” icon on your dashboard tab to exit edit mode.
Conclusion
Congratulations, you have successfully created a Node-RED flow within Home Assistant that controls a space heater based on the temperature of a room.
Essentially, we have overengineered the thermostat problem. Between space heaters that have built-in thermostats and homes with equally insulated rooms, I imagine that this tutorial fills a very niche need and is losing relevance by the minute.
Regardless, controlling a space heater this way keeps you safe by cutting the power when the temperature is too high. It allows you to keep a close eye on the temperature of a room throughout the day and monitor your energy usage. I could see this project being well suited for anything from caring for plants to keeping a baby’s room warmer than the rest of the house.
If you found this useful, let me know what you made with this tutorial in the comments below!